Polaris Leap
Leap
Leap is a web-based circulation tool for Polaris that will allow circulation staff to perform basic library services outside of the library. Although Leap has been designed to work best on a laptop, it will work on tablets as well. Using Leap on a smartphone is not recommended. Leap can be accessed at https://leap.tracpac.ab.ca/LeapWebAppExternal.
Watch these short videos to learn LEAP fast! Created by YRL. Watch on PLS Staff Niche Academy or YRL's YouTube channel.
1. Overview and How to Access
2. Leap Interface & Workforms Tracker
3. Quick Search Bar & Find Tool
4. Patron Records
5. Register New Patrons & Merge Duplicate Persons
6. Renew, Edit, Delete Patron Registration
7. Register Multiple Family Members & Issuing Child Cards
8. Patron Notes & Patron Blocks
9. Patron Fines, Fees & Charges
10. Checking Items Out to a Patron
11. View, Renew, and Modify Items Out to a Patron
12. Checking in Items (Normal, Bulk, Damaged Items, and through Item Records)
13. Hold Requests
14. Claimed, Lost, Damaged Items
15. Request Manager and Picklist Processing
16. Item Records
17. Bibliographic Records
18. Leap Help Menu
19. Reports & Notices
Available on PLS Staff Niche Academy.
Polaris LEAP: Circulation. Created by PLS
Polaris LEAP 1: Getting Started. Created by YRL
Polaris LEAP 3: Inventory. Created by YRL
Leap Item Records. Created by YRL
Leap Item Records 2. Created by YRL
LEAP Patron Accounts. Created by MLS.
Polaris LEAP: Circulation. Created by PRLS
Polaris LEAP: Beyond the Basics Webinar. Created by PRLS
* Need help logging in to Niche Academy? Contact Meagan McNaney.
LEAP QUICKSTART
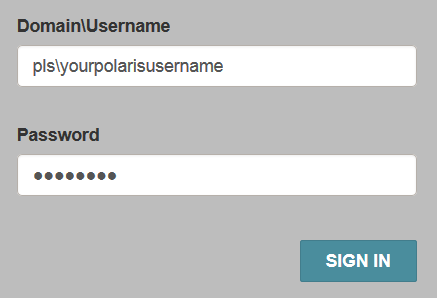
Your username and password will be the same as your Polaris login information. Don't forget to add the domain - pls\ before your username.
When you click the Sign In button, you will be asked to select your branch and workstation. Like logging into the Polaris staff client, the branch will default to your library. Each library has a virtual Leap-enabled workstation, so you only have to click Continue.
Once you are logged into Leap, you will see the Leap interface. From here you can look up items or patrons, register a new patron, check items in, or even pull up your Request Manager.
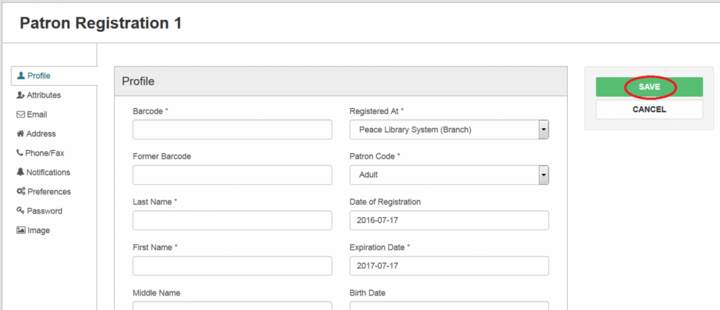
To register a new patron, just click on the New Patron button. Fill out the information (any field with an * is required) and hit Save.
Note: Although the expiration date defaults to one year, you can click the date and use the calendar to choose a new date.
Patron Renewals are quick and easy with Leap. Just search for your patron and in the Patron Record, click Registration. You will be taken to the registration screen. Just click the Renew button on the right and choose the renewal term (by month, year, or a custom date) in the pop-up screen. Once the date has been chosen, click continue and then Save.
There are two ways to search in Leap. Use the Search bar or the Find Tool.
1. Search bar searching
The Search bar is a very google-like search. As you type in a patron name (or barcode, address, email, etc.), Leap will return suggestions for patrons and titles.
2. The Find Tool
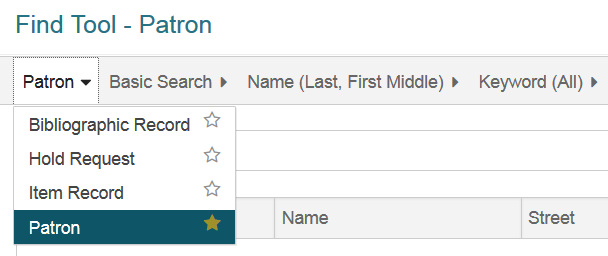
The Find Tool allows for searching by Patron, Bib Record, Item Record, or Hold Request. To set your search default, just click the star to favourite your search method.
Like in the Polaris staff client, holds can be placed from either the Patron account or the Bib Record.
From the patron account, click on the Holds/Held link and then click the New Hold button. From there, search for the title information, choose the pickup location and then click Place Hold to save.
From the bib record, click the Place Hold once you have found the correct title. Leap will bring up the find tool so you can locate the correct patron.
Once you have the correct patron, click Place Hold to save the request.
You may have noticed when you first logged into Leap that there is no Check Out button. In order to check items out to a patron, you first need to load the Patron record. Once you open the Patron record, Leap defaults to Check Out. Just scan (or type in the barcode for) the items one at a time. Once you have checked out at the items, click the Complete button. This is where a receipt will print (if you have Leap setup to print receipts) or an eReceipt will be sent.
To check items in, click the Check In. You can find the Check In button on any of the Leap screens in the top left. Leap defaults to the Normal Check In, although Bulk, In House, and Inventory are available as well.
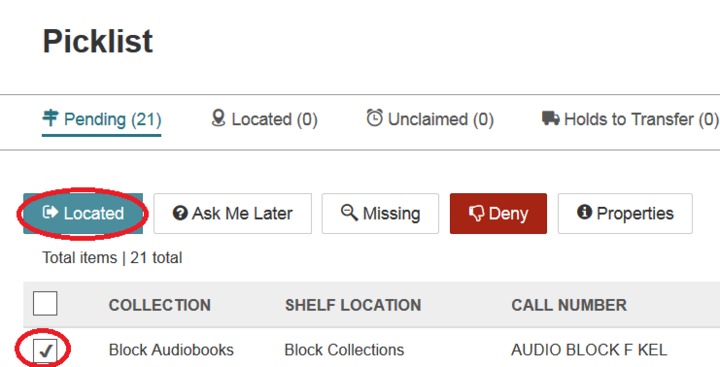
The Leap Picklist is equivalent to the Polaris Request Manager. To access the Picklist, click on Utilities (in the top right corner) and then Picklist Processing. Using Leap to pull the items requested saves you from printing the list every day. All you have to do is carry your device (tablets may be a better option to carry through the stacks) and ask you pull books, tap the item checkbox and then hit Located.
The item then disappears from the Pending list. Once you have your items in hand, just take them back to the circ desk and check them in using the Staff Client to get the In Transit slips.
If you accidentally set the wrong item to Located, just click on the Located link in the menu bar. Just check the item and click Return.
RECEIPT PRINTING
The following adjustments need to be made for receipt printing in LEAP:
- In the printer properties -> device settings tab, adjust the advanced paper size to 72mm x 200mm (from 72mm x receipt) [shows as FRICTION]
- In the advanced tab -> printing defaults -> advanced options, set the paper size to 72mm x 200mm (from 72mm x receipt)
- In LEAP, ensure the appropriate options are ticked off under the settings tab (check out receipt, check in receipt, fines, etc.)
- Upon pressing complete to generate the print out, ensure the header/footer is unchecked to keep the print out clean.
SPINE LABELS
When logged into LEAP, click on your username in the top right corner, then click settings.
- Scroll down to the label options area, select PLS Spine LEAP as the label type, on demand as the print method, and cataloging options as the label default, then click save.
- To print a label, open the item record, then click actions -> print label.
- In the label preview area, click actions -> print label.
- Print the label generated in the popup window.
Note: Depending on your device and where you are using Leap, printing may not be an option. For tablets, printing is only an option via something like a bluetooth printer. From a laptop, printing is a bit more reasonable. To configure the printer, click your username in the top right and then Settings. There is no option to select the printer in the settings, instead when you print, the browser will ask you to choose the printer as is normal for Windows printing.
Instead of running these reports from web based reporting services, you’ll need to click on the utilities menu in LEAP, then select print notices. Once ran, it will then prompt you to post to the database.
More information can be found here: https://documentation.iii.com/leap/7.5/Default.htm#LEAP1_0/print_overdue_billing_hold_fine_combined_notices.htm?Highlight=post%20to%20database
Any time you open a record (patron, item, bib, etc), remember to click the big red Close button in the top right corner. If you forget to do this, the record stays open. Open records keep them locked from any other usage.
You can always see what records are open by clicking the three lines in the top left corner. This will open up a list. You can close records one by one, or just click the Close All at the bottom.
Created by YRL:
- Check Out & Check In
- Placing Holds
- Exploring Patron Records
- Patron Registration
- Merge Patron Records
- Placing Bulk Holds
- Picklist Processing
- Accessing Reports
Created by MLS:
- Searching Materials and Placing Holds
- Circulation Basics
- Item Records and Volume Control
- Notes Procedure
Created by Northern Lights:


